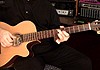
The second chord in the progression is C and this fuller C chord (shown above right) is often not used to advantage by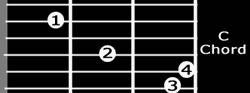 players, even when strumming. We will show in the video the advantages of this chord
configuration over the typical three fingered C. This configuration also makes the
transition to a thumb over full F chord much more efficient. This thumb over
methodology is a very handy one and is used by many fine players. It is less restrictive
for many than traditional bar chords and is easier on your wrist as well especially when
playing low on the neck (near the nut). Many players incorporate both styles, and in the
video below that sums this section up, you will see some of the advantages. As always,
incorporate that which is of use to your style. Give new ideas a reasonable try before
discarding them. Any new method may feel uncomfortable at first. For instance, I taught
myself chords at a very early age using the thumb over method. It seemed logical at the
time and while I use bar chords as well (usually further up the neck), I simply cannot get
comfortable with a bar chorded F in the open (first fret - no capo)
position.
players, even when strumming. We will show in the video the advantages of this chord
configuration over the typical three fingered C. This configuration also makes the
transition to a thumb over full F chord much more efficient. This thumb over
methodology is a very handy one and is used by many fine players. It is less restrictive
for many than traditional bar chords and is easier on your wrist as well especially when
playing low on the neck (near the nut). Many players incorporate both styles, and in the
video below that sums this section up, you will see some of the advantages. As always,
incorporate that which is of use to your style. Give new ideas a reasonable try before
discarding them. Any new method may feel uncomfortable at first. For instance, I taught
myself chords at a very early age using the thumb over method. It seemed logical at the
time and while I use bar chords as well (usually further up the neck), I simply cannot get
comfortable with a bar chorded F in the open (first fret - no capo)
position.
And finally, the last chord is a much more robust sounding D chord with simply the E
6th string covered by your thumb on the second fret. This one will also allow for far more
interesting transitions throughout the G progression. We will also show
the more traditional ways of playing all of these chords and some of the inherent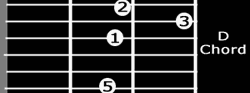 weaknesses and strengths associated
with the more traditional configurations. The bottom line is that you should be able to
play ALL configurations (there are many) of these first position chords
and use them as necessary to get the most out of your playing. Click the video link
below to see the demonstration. ***Note the .mpgs are for Mac users who can't use
the Window's Media Video Format. Windows users are encouraged throughout this publication
to always try the .wmv versions first. Because of the size of some of the files,
obviously broadband is going to be a great help to you. However, even at 56K, once you
download these files, you can save them to your computer for future, more efficient
viewing at your convenience. We can't emphasize enough how important it is to save these
files so you can look at them off line. You'll find it much easier to relax and
internalize those things you feel important. Remember adrenaline, and anxiety are not good
partners to learning. weaknesses and strengths associated
with the more traditional configurations. The bottom line is that you should be able to
play ALL configurations (there are many) of these first position chords
and use them as necessary to get the most out of your playing. Click the video link
below to see the demonstration. ***Note the .mpgs are for Mac users who can't use
the Window's Media Video Format. Windows users are encouraged throughout this publication
to always try the .wmv versions first. Because of the size of some of the files,
obviously broadband is going to be a great help to you. However, even at 56K, once you
download these files, you can save them to your computer for future, more efficient
viewing at your convenience. We can't emphasize enough how important it is to save these
files so you can look at them off line. You'll find it much easier to relax and
internalize those things you feel important. Remember adrenaline, and anxiety are not good
partners to learning.
The Videos
 |
 |
 |
| GCD 1
.WMV |
GCD 2
.WMV |
GCD 3
.WMV |
|
|
|
| GCD 1
.MPG |
GCD 2
.MPG |
GCD 3
.MPG |
Tuning the Guitar
Next we want to show you a video of a tuning technique that we have found
to be far superior to others we have witnessed or that are often taught. The basic concept
is using the G (3rd) string as your tonal basis rather than the bass E or A
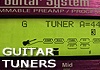
string which we often hear recommended. While we subscribe to guitar tuners for getting
the overall pitch accurate to concert pitch if necessary, we do not feel one should
develop a dependency on them for tuning the rest of the guitar. In other words, get the G
string to concert G if that is your goal or the G string
to whatever pitch is necessary to match the instruments or music you are going to
accompany and then tune the rest of the instrument using your EARS. Tuning the strings in PAIRS
is vital and we will show you why and how as well as the ever important 0/5 relationship
between most string pairs. It should come as no surprise to those who have used tuners
that the G string is the most easily "heard" by such tuners and
is almost always the most stable once you get the pitch right. In other words with a
tuner, the G string "wanders" around less (from attack to
release (the sustained note) on the tuner's scale than do other strings. It is also much
easier for the human ear to hear slight variations in the pitch of a G
string when compared with lower frequency strings. And since the B and E
1st strings are always a compromise to some degree, we think focusing on the initial G
will give you the most efficient method of tuning to the proper pitch and ultimately
quickly tuning the whole guitar to itself. Below is a video showing the advantages of
using the G String as a tuning reference. The popular "electronic tuner" is used
to achieve concert pitch. However and again, we cannot overemphasize the disadvantages in
becoming dependent on such devices, except for getting that initial reference string
pitch.
 |
|
| .WMV |
.MPG |
Now on stage or in a very noisy environment you may require some kind
of electronic tuning device but frankly, as mentioned above, depending on them is not
helping your ear or your playing. Often during a performance, the instruments you need to
be in tune with may not be capable of achieving concert pitch, so relying on a
perfect pitch device is often counter productive to an overall in-tune sound. Your ears,
unless you have a physical defect, are plenty good to tune any guitar (at least if the
intonation is decent) even under noisy conditions. For the following video tuning
demo, we'll be using a very cheap guitar with very dead strings and very cheap
tuners - in other words the very worst-case scenario, (except for the fact that even low
end Takamines have outstanding intonation)- so you can witness for yourself that the art
of tuning a guitar need not be so traumatic and your financial resources can be better
utilized on things other than expensive electronic tuners.
One last issue about tuning before we show the video. There
always exist the possibility of temporary tone "blindness". This comes about
from trying to listen too hard or for too long to a single tone. It is
this very tendency of one's ears to go a little "dead" after frustrating
attempts at fine tuning that causes us to encourage the tuning process to be both accurate
and FAST and done in pairs. Even the anxiety one feels in front of an audience can cause
your ears to misbehave. Tuning needs to remain adrenaline free, a mellow and rewarding
activity, so relax and be fluid and flexible in your motions. Moving tuners in tiny
increments can exacerbate a negative experience so what you will see in the video is a
wider range of tuning peg movements rather than the small, often maddening attempts to
minutely "inch" the tuners into the proper position. And the act of tuning, well
below and above the desired pitch alternatively, especially using the "pairs"
method, we think you will find can definitely make your tuning life easier and your ears
and your playing much better. The video follows below: A brief note: In the video,
remember the B string sounds flat when playing an "E" chord if the B is tuned to
match perfectly with the G string. A slight bump up in pitch for the B string tuning makes
for a good compromise for playing in both keys. Also don't forget the huge advantage of
internalizing the sonic 0/5 relationship that exist between most of the string pairs
except the G/B.
The Fretboard
Finally as our last and perhaps most important part
of the debut of this Guitar Basics Section, let's look at an
overview of the guitar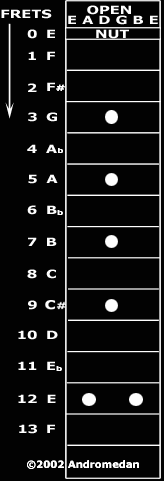 neck (fretboard) and its relationship to music theory. Believe it or not this
simple exercise should take most of the mystery out of figuring out what you are playing
and where you want to play it. The diagram at right is basically a course in music theory
in a glance and should provide great insight into why a guitar is tuned the way it is
(standard tuning of course for now) and how it relates to transposition, scales and all
other issues that arise when using or attempting ANY chord progression. First, for those
that need to hear it, a chord progression is simply a pattern of chords that logically and
musically fit together. There is almost no limit to the variations available for a chord
progression to exist but nearly all follow fairly simple and uniform rules and most
popular songs ever written vary between a half a dozen or so progressions. Music theory is
simple math while the music itself, at its best, is pure heart. One would be wise to get
the theory internalized in as logical and easy to use way as possible in order to get to
the far more important business of playing music with your heart rather than your brain. I
know the listener will greatly appreciate this distinction. neck (fretboard) and its relationship to music theory. Believe it or not this
simple exercise should take most of the mystery out of figuring out what you are playing
and where you want to play it. The diagram at right is basically a course in music theory
in a glance and should provide great insight into why a guitar is tuned the way it is
(standard tuning of course for now) and how it relates to transposition, scales and all
other issues that arise when using or attempting ANY chord progression. First, for those
that need to hear it, a chord progression is simply a pattern of chords that logically and
musically fit together. There is almost no limit to the variations available for a chord
progression to exist but nearly all follow fairly simple and uniform rules and most
popular songs ever written vary between a half a dozen or so progressions. Music theory is
simple math while the music itself, at its best, is pure heart. One would be wise to get
the theory internalized in as logical and easy to use way as possible in order to get to
the far more important business of playing music with your heart rather than your brain. I
know the listener will greatly appreciate this distinction.
First
look at the diagram of the guitar fretboard at right. As you can see and probably know
there are 12 frets per octave. If one reduces each of the notes, using the bass (E 6th)
string as a reference, the notes up the neck, starting with Open being E are laid out. I
would suggest that there is no more important single piece of knowledge for the budding or
even proficient musician than that which is made apparent by this diagram. The real issue
is developing your ability to think of each note as a number, where, for example, G is
always 3, A - 5, D, 10, B - 7, E - 0 or 12, and so on. Once that relationship in ingrained
into you subconscious, you will never again question what key you are playing in or what
notes chords are appropriate to any given progression.
For
example, lets take first the progression considered at the top of this article. G,C.D.
Look at the spacing of those notes on the bass string. G is 3, C is 8, and D is 10. Now G,
C, D is precisely the same progression, relatively, as E, A, B, the old blues and ever
prevalent rock standard. Of course, within these progressions there are many, many
possibilities as to the order in which you play these chords or notes but they share in
common a mathematical relationship that will make future transposed progressions seem very
simple. That code is found in the E, A, B, or 0, 5, 7. You will notice that the fret count
spacing between the E progression chords and the G progression chords is identical. More
to the point, this spacing now allows you to instantly transpose to any starting chord
this three chord progression. For example if you start in F, then go up 5 frets to B flat,
then two more to get to C, Do this for yourself until you can immediately recognize the
three chord progression based on 0, 5, 7, no matter where you start. Looking at the notes
on the fretboard (some actually, as I did at the age of 6 will initially put some masking
tape along the neck showing each fret value and count up five and then two more to seven).
Simple rock songs like Louie, Louie use these very chords. A quick video is in order here
to show how no matter where you start, this three chord progression holds true for a song
like Louie. Watch the video.
Now that you've seen it, try to play this quick piece starting in every fret
position up the neck, concentrating mostly on the bass string. The 0, 5, 7 relationship is
unwavering. Now most music teachers will refer to these three notes as 0, 4, 5 which is
often the cause of much confusion with beginning players. While it is true that the WHOLE
notes are 0-E, 1-F, G-3, A-4, & B-5, the fact is the in-between sharps and flats are
every bit as important and used as much as these whole tones. The 0, 5, 7 concept includes
all the notes on the neck with equal importance and frankly is a lot more logical,
especially if you are starting in a non whole note key like B flat, or F sharp.
So far we have discussed major chords like E, A, B, or G, C, D. Now it is time to
simplify the MINOR keys as well and extend the scenario to the relative position of these
more moody minors to any beginning chord progression. One of the most commonly used four
chord progressions is C, A minor, F, G (From here on all minors will be noted with simply
a small "m". Thus C, Am, F, G. Now play it. Simple right? NOW - look at the
mathematical relationship between these 4 notes or chords. As C is 8, then A(m) is 5 or
minus three from the starting position, F is either down 7 or up 5 and G is either down 5
or up 7 from the starting point of fret 8.
Because a guitar neck only has so much length, often we go down the neck to reach
the subsequent chords in any progression rather than go up and wind up playing on the 15th
fret. By the way, what is the note on the bass string at the 15th fret? Well 12 is E, same
as 0, so 15 is three higher or G. It is the G at the next higher octave up from the
lower 3rd fret position of G. As you can see in a Three chord progression like C, F, G you
can go down 7 or up 5 to get to the next chord F. 7+ 5 =12 This is no accident. Whichever
way you go adds up to 12. So if you are starting high on the neck for your first chord,
you will likely go down the neck rather than up. It is important to note here that I
always refer to down or up as related to tone. In other words down the neck means heading
lower towards the nut. I also use this strategy in referring to the 6 strings on a guitar.
For example when holding the guitar, I will refer to the next string up as being the
higher pitched string, NOT the one closer to your chin. So the A 5th string is UP from the
E 6th. Some people when you tell them to go up a string will invariably to up towards
their chin but not here. This is very important to remember when watching the videos that
have audio commentary). To internalize this whole thing quickly, think simply of
numbers and tones. So C, F, G, is EITHER 8, 1, 3 - OR 8, 13, 15. To simplify, from C (8)
it is 8, -7, -5. Now throwing in the Am to get the FOUR chord progression C, Am, F, G, you
get, starting at C, 8, -3(m), -7, -5!
So now here comes the fun! Say you know only how to play C position chords. But
you need to sing a song in E flat, (Eb). Where do you put your capo. Look at the fret
board. Eb is 3 notes up the neck from C. So you put your capo on the third fret and
playing the fingerings of C, Am, F, G you are actually playing Eb, Cm, G# (sharp), and Bb.
Try that without a capo and you'll quickly see why they were invented and about the same
time the first guitar-like instrument was. Now do the preceding with other starting points
until you "know" exactly which chords must be played or are played when you move
your Capo. Put your capo on the 5th fret. Play a G chord (G fingering) what chord are you
actually playing. G is 3 + 5 = 8 or C. That's right, your are playing in the key of C even
though you are using a G position fingering. So even though you are playing a G, Em, C, D
fingering, because your capo is on the fifth fret you are actually playing in the key of C
the chords C, Am, F, G. You basically now have in front of you all that is needed to
transpose to any key. See video at end of this section that illustrates the
highpoints.
And finally let's finish the discussion of minor chords in their mathematical
relationship to a given major starting chord. The easiest to illustrate (and play for most
people) is the key of C again (C, F, G). There are three predominant minors that relate to
C. There are others that work in certain arrangements but let's stick for now with the 3
most common. They are Am (already discussed above) Em, and Dm. Each have names and while
we don't subscribe to secular terms that often lead to confusion, there is simply no
better way to describe the common minors of any key. So here goes. The relative
minor of C is Am (-3 frets and make it a minor). Em is the dominant minor
of C. It is also the relative minor of G, the third chord in the C, F, G progression.
Likewise Dm is the sub-dominant minor of C or the relative minor of F.
Now if someone came into my studio for a session and starting speaking in terms like these
it is likely I would throw their butt out. Why? Because of the very secular nature of
musicspeak, like legalese, it is an impediment to communication and understanding. So
instead, lets go back to the numbers. The three major chords listed above each have their
own relative minors and all of those relative minors are 3 frets (notes) down from their
major. They are also, in relation to the original or (tonic) key of C, the following: Am
is 3 frets down from C (then make it a minor). E(m) is 4 UP from C. The parentheses around
the "m" is to remind you that you go up 4 frets and make it a minor.
Dm is 2 frets up from C and then make it a minor. So you can look at any progression and
EITHER figure out by subtracting 3 from any chord in the progression to find the relative
minor but in most music it is far more logical to concern yourself with the tonal
relationships of these three minors to the original C chord. The video
below also addresses this and will let you hear that relationship.
But first a little table to show you the relative positions of the notes associated with
the chords.
| Chord
(Key of C) |
Relative
fret position from C (8) |
| C |
8 |
| F |
-7 or
+5 |
| G |
-5 or
+7 |
| Am |
-3 or
+9 (m) |
| Em |
-8 or
+4 (m) |
| Dm |
-10 or
+2 (m) |
These relationships are identical in all keys.
Remember them and practice finding them quickly. Play all 3 majors and all three minors
starting in G (3) position. Which are which. Then using the neck diagrams above work out
the the predominant minors in all keys. When you can correlate that way quickly, you get
your transposition badge and you will no longer have that puzzled expression on your puss
when someone asks you what KEY your playing in.
There is however, one last thing that is so obvious that we've not addressed it. The
guitar has 6 strings. Damn!!! No - its a good thing!!! So
now rather than wandering up and down the neck, this marvelous instrument was designed to
play these chords with little lateral movement. This is called the FIRST POSITION.
You, in reality, simply may go to higher or lower pitched strings to accomplish the same
result as going up or down the neck. Most of you know the basic chords and already do
this. Now it is up to you to use the above information to internalize the math driven
relationships that exist by both traveling the neck and using higher or lower pitched
strings. As we said at the beginning of this last part, the fretboard diagram above is
your map. Instead of going to the 5th fret to play a bar chord Am, you can play it in the
"first" position as most of you know how to do. (You can also put a capo on the
5th fret and play an Em).
However and most important, it is WHY you play an Am, or Em, or
Dm after a C and how it fits musically in the song that is far more important to the world
in the long run. The premise is always taste and economy of motion. The less distance you
have to move, the smoother your playing and the quicker you will learn which chords are
appropriate to any piece. And don't forget the capo. Segovia used them as do nearly all
great guitar players except for certain jazz aficionados and lead players, when they are
playing lead and especially bass players who are simplified lead players as well (some not
so simplified these days). This is so because they are usually playing with a group of
musicians and don't need to provide the entire music bed of any piece. There is nothing
more boring than watching and listening to some solo performer playing a Bb progression
using bar chords when they could have used a capo on the third fret, played in G position
and had a lot of fingers and open strings left over for those little nuances and string
tickles that make music infinitely more enjoyable to the listener. Now as promised, here
is the video so you can hear how these minors relate musically to the
base C chord. Remember the relationships seen in the C progression below
are identical in all key progressions. Learn them using the neck chart above and the table
under it. Do the math. It will make all of this quite logical and thus simple in the long
run. Until further updates, of which there will be frequent and many - experiment,
internalize, and enjoy. There will be much exploration in the near future of blues, jazz,
as well as lead technique. It is our recommendation that you get a CAPO if you don't have
one already and you might consider thumbpicks and fingerpicks as well. Over time I think
you will see there are distinct advantages to these little tools. This magazine will be
here a very long time and we will cover an awful lot of ground. Hope you continue to
enjoy.
 |
|
Releative
Minors
.WMV |
Relative
Minors
.MPG |
The Thumb
The next area we want to cover quickly is thumbpick
technique. I realize this magazine is and goes by the name of "Fingerpick" but
truly the thumb work is without doubt, the most vital part of the fingerpick style. The
whole point of fingerpicking a guitar is to provide both bass line, rhythm, and lead
simultaneously and just like drums and bass in normal arrangements, those thythm tracks
often carry the entire song to success or failure. I think the following videos will help
get you started. Again thumbpicks may seem somewhat ungainly at first but the power
and and accuracy they offer is hard to beat while providing very clean tone when
playing even lightly.

We
recommend the Fred Kelly "Speed Pick" in either Light gauge
(yellow) or Mediums (orange). I've used nothing else since I discovered them a couple of
years ago. I especially like the light for many pieces as the shaft is very flexible -
enough so in fact, to use it at a moments whim as a lead flat pick as well. The orange is
about as heavy as I usually go with the exception of Dobro performances which I will cover
shortly. For that I will use the Heavy (white) gauge Kelly speed pick. You can see these
picks at www.fredkellyspicks.com
and Elderly www.elderly.com has them at a great price. Buy yourself a dozen
or so though, as you will lose them before you ever wear one out, your friends may tend to
"accidently" put them in their pockets like some folks do with pens and
lighters. Now the videos you are about to watch (Remember the .WMV's are for Windows
users and the lower quality, poorer resolution MPGs are for Mac folks. Even though the
MPGs are lower quality, they are larger files which is yet another reason we prefer the
Windows Media format. Quicktime is even less efficient (much more so) than even MPGs so we
don't even bother with it. Apple would do well to write some new compression algorithms).
Anyway the three videos below showcase the thumb as well as the index and middle finger
(using fingerpicks as usual - we find them unmatched by nails which are a pain to maintain
while the power one gets with certain fingerpicks is quite impressive). Of course, like
thumbpicks they take some getting used to but the Jim Dunlop Brass light gauge .015s (also
at Elderly www.elderly.com)
are very flexible, easy to fit and have some give in the right places for nuance, making
them seem much more natural than the harder traditional nickel steel Nationals many use.
On last note here: The pieces below are all played with the capo on the third fret
in standard tuning. We concentrate on the position of Am and there will be a follow up
video tomorrow which show what I'm doing with the left hand in case you get lost. Hmmm . .
. capo on third fret, Am positon . . . what actual key are we playing in? Anyway,
remember, the real exercise is for the thumb. Let that sucker dance over the strings. The
thumb is your dancing, tapping feet. Stay loose and enjoy the rhythmic capabilities of
that most important human appendage - the thumb. More will be added daily to this
section showing both hands together and frame-in-frame shots as well. Also we'll
concentrate in the future on how the bass (thumb) pattern changes as you change chords,
You'll notice this if you watch carefully in these preliminary videos but we'll inspect
this process more fully in the next day or so. The point is, the bass "riff" is
a counterpoint tonally that is pretty similar to what a bass player would play if you were
fortunate to have such an addition to your music ensemble. Keep at it:
 |
|
|
| Thumbpicking
101 WMV |
Thumbpicking
102 WMV |
Thumbpicking
103 WMV |
|
|
|
| Thumbpicking
101 MPG |
Thumbpicking
102 MPG |
Thumbpicking
103 MPG |
"G" Tuning
Demo
Now the following videos deal with "G" Open
tuning (from 6th to 1st = D, G, D, G, B, D) This video will eventually windup on the
Acoustic Guitars page and if you read that page and the Editorial Page as well (when they
are ready), you'll understand why. Basically, we find that there are those who are under
the impression one needs extraordinarily expensive instruments to produce a very good
sound to an audience or in the studio. We find the point silly. Its the performance that
really matters and as long as your instrument has good intonation and balance and the
action is easy on the fingers, you should never feel inadequate. More on that on the other
pages we mentioned but for now enjoy the G Tuning preliminary. We will of
course over time go into much greater depth regarding alternate tunings and variations on
the G specifically. We just wanted to show you the versatility of the tuning from sweet to
funky in a few clips. I think you'll enjoy. We'll let you know about the guitar itself
soon. For now, take our word for it that high quality, wide neck slotheads exist that are
perfect for blues, and the sweet things as well, AND at a reasonable cost. Remember,
the MPG's are for Mac Users or others who, for whatever reason, can't use the Windows
Media Format - and also remember, that your creativity and playing will always be
far more important to us than the cost or brand of guitar - or computer - you own. Take
this stuff and run with it and let us see it taken to new heights. Please note that in the
last two videos we use a capo. We have not had any problems tuning the guitar slightly to
compensate for minor pitch changes that accur at times when using a capo. There are many
theories about placement and I try to keep the capo as close to the fret back as possible.
I also like to have tha capo parellel to the frets but often (as you will see in the
video) I don't take the time to fuss over it. So when using your capo, feel free to adjust
the tuning (usually the lower strings) a bit to keep your instrument in tune with itself.
However never tune from say a standard tuning or a co,pletely out of pitch guitar with the
capo on. This can cause fret wear. Again if you're going to change tunings, do it with the
capo off and then "tweak" the strings as needed when the capo is in place. Never
leave your capo on the strings (fretboard) when the guitar is not being played. This is
bad for both the capo and the frets. I suggest keeping the capo, especially the Kyser
style, on the headstock, if sufficient flat surface is there as this will flatten the
rubber pads of the capo and keep it true longer and make it usable on many different
guitars with different string spacing.
 |
|
|
|
Open
G-Tuning
"Wanderings"
.WMV |
Open G
Tuning
"SlotHead Crawl"
.WMV |
Open G
Tuning
"Wanderings"
.MPG |
Open
G-Tuning
"SlotHead Crawl"
.MPG |
 |
|
|
|
Close-Up
"Wanderings"
.WMV |
Close-Up
"SlotHead Crawl"
.WMV |
Close-Up
"Wanderings"
.MPG |
Close-Up
"SlotHead Crawl"
.MPG |
|
|
Close-Up
"MORE Wanderings"
.WMV |
Close-Up
"MORE Wanderings"
.MPG |
There's still more to come in this initial section so get busy and
get ready - Doug |


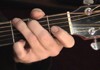
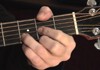
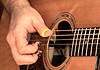
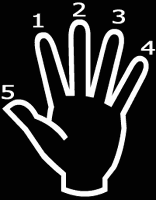 most of our
readers may be well advanced from this starting point, there are a surprising number of
players I have seen and met (including many who play for a living) that are missing a
couple of key adaptations of the three basic chords at right. So using the hand graphic at
left as your fingering guide, incorporate the three chords at right with this precise
fingering. A video link will appear below to show you why these particular configurations
of first position, standard tuning chords are a vital addition to your
playing arsenal, IF you have not already incorporated them.
most of our
readers may be well advanced from this starting point, there are a surprising number of
players I have seen and met (including many who play for a living) that are missing a
couple of key adaptations of the three basic chords at right. So using the hand graphic at
left as your fingering guide, incorporate the three chords at right with this precise
fingering. A video link will appear below to show you why these particular configurations
of first position, standard tuning chords are a vital addition to your
playing arsenal, IF you have not already incorporated them.  index finger for nuances, but sets you up, as well, for far faster, more
efficient changes to the other chords in this three chord progression (G,C,D).
We will discuss chord progressions in greater detail in the second part
below, as they are at the heart of truly understanding what you are doing
on the guitar rather than simply playing what you have seen or been shown by others. It
will continue to be the focus of this publication to share with you ideas that have
consistently improved the capabilities of a lot of players.
index finger for nuances, but sets you up, as well, for far faster, more
efficient changes to the other chords in this three chord progression (G,C,D).
We will discuss chord progressions in greater detail in the second part
below, as they are at the heart of truly understanding what you are doing
on the guitar rather than simply playing what you have seen or been shown by others. It
will continue to be the focus of this publication to share with you ideas that have
consistently improved the capabilities of a lot of players.